Building a Silent 6 GPU Ethereum Mining Rig
This blog post documents the construction and operation of a silent 6 GPU Ethereum miner I built for fun.
Introduction
The miner built in this project is capable of 115 MH/s at 645 watts. While running, it produces an average to low amount of heat, and as a result, the fan speeds are low. At the time of this build, it cost about $2,285, and produced about $7,000 worth of Ethereum per year. Where I live, electricity costs about $0.12 / KWh, so the net electricity cost per year is about $673.
This blog post will also cover the steps required to build your own case. If you would prefer to buy a case, there are plenty of 6 GPU mining cases available on the internet, and you can skip the section titled "Building the Case". However, pre-built mining cases are usually quite expensive when purchased online, so I would recommend building your own if you have the capability.
Construction
This section of the blog post documents the actual construction of the miner. If you already have a mining rig and would like to learn how to configure it, skip to the Operating section.
Collecting Components
These are the main components for the miner that you will need:
| Price | Name |
|---|---|
| $1,860.00 | 6x EVGA GTX 1060 SSC 6GB |
| $145.00 | MSI Z270 SLI PLUS |
| $95.00 | Rosewill BRONZE Series 1000W |
| $50.00 | Kingston 120GB SSD |
| $50.00 | Team Elite Plus DDR4 4GB |
| $55.00 | Intel Celeron G3900 Dual-Core |
| $30.00 | PCIe 16x to 1x Powered Adapter Cards |
| $8.00 | Power buttons |
Also, a few things to keep in mind:
- In this guide you'll notice I'm using a variety of cards. This is because I wanted to test each of them to see the hashrate. The procedure for building the miner remains the same, assuming the cards all fit within the case.
- Prices may have changed by the time you are reading this.
- If any of these are out of stock, I would recommend googling the name of the product to find different sellers, or search for a good replacement. If you find a replacement instead, ensure that what you get will work with the rest of the components.
This leaves you with a bill of about $2,293. That may seem like a staggering number at first, but look at it like this:
- If you are making $7,000 per year, you will be able to entirely recover from this purchase in less than 4 months (
$2,293 / $7,000 * 12). - You aren't actually losing value of your assets by buying components, only converting it from one currency to commodities. These commodities can easily be resold, with little money lost, and profit could probably even be made by doing so.
- You can most likely return the components if something doesn't work out. It's up to you and the seller to determine this, however.
It really is not as risky of an investment as it might seem at first. The most likely scenario in which you will lose all of your money is where all cryptocurrency markets crash to zero and stay there (defeating your purpose for mining), and the price of all your components go to zero and stays there. Quite unlikely. If the price of cryptocurrencies were to drop so severely, it's generally a good idea to buy in before it rises again.
When I built this Ethereum miner, I bought a variety of cards so that I could compare them in this post. So here is the data I collected (not overclocked):
| Cost | Name | Hashrate (MH/s) | USD / MH/s |
|---|---|---|---|
| $260 | MSI GTX 1060 | 15.650 | $16.6 |
| $300 | EVGA GTX 1060 SC | 19.730 | $15.2 |
| $310 | EVGA GTX 1060 SSC | 19.745 | $15.7 |
| $350 | ASUS STRIX GTX 1060 | 20.250 | $17.3 |
The last column of the above table represents the cost per MH/s of the graphics card. The lower the number, the better the deal. Here is what you can get from this table:
- The best deal is the EVGA GTX 1060 SC. It delivers the largest hashrate for the best cost.
- The most expensive and fastest card is the ASUS STRIX GTX 1060 (I will also note that it has a much lower operating temperature while mining).
- The cheapest card that delivers around the same speeds is the MSI GTX 1060.
- Also, this isn't part of the table: The card on which I was able to acheive the largest stable overclock was the ASUS STRIX GTX 1060.
From using this rig, I've noticed that the EVGA GTX 1060 SSC draws more power than the EVGA GTX 1060 SC, but it has much better cooling. However, the ASUS STRIX GTX 1060 was consistently a great deal cooler than the rest of the cards I tested, and the power draw was less than the EVGA GTX 1060 SSC (but more than the EVGA GTX 1060 SC).
Note that the power usage is not factored in to the table.
Towards the end of this blog post, I will talk about how to overclock the graphics cards. I was able to acheive about 3 MH/s more per graphics card which maintaining a stable overclock.
The parts needed to build the case will be covered at the start of the next section.
Building the Case
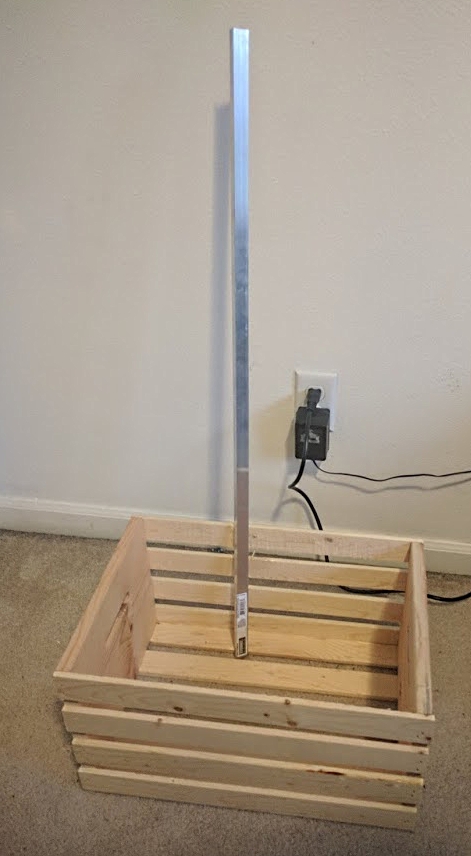
The first part I built of the miner was the case. It is mainly composed of an 18"x12.5"x9.5" crate I picked up from Home Depot and a 1"x36" aluminum L-shaped angle bar. You'll probably want some feet for the crate (because the screws that hold in the motherboard must stick out a little bit), so I would recommend getting some 1/2" rubber feet.
Making GPU Holders
The first step is to remove the stickers from the items. You can use a plastic wedge if you are having trouble peeling it, or you can use isoprophyl alcohol to scrub it off. I would not recommend using a knife, because doing so will result in scratches on your brand new bar.
Next, saw the metal bar 18 inches away from one of the sides (half way through). You can use a file to clean the ends off if you want to make the edges more round.
Leave one of the halves aside. We will be dealing with the one of the halves only for now.
If you will be using 6 graphics cards, each graphics card is dual slot, so the width is 1.38 inches, and the width of the wood planks on either side of the crate is 3/4" inches, the following formula can be used to calculate the amount of space each graphics card will be able to take:
    ((length of crate) - 2 * (width of crate side)) / (number of graphics cards)
    = (18" - 2 * 0.75") / 6
    =  2.75"
2.75 inches is more than enough space for the GPUs. Let's see how much space will be between each card, while we're at it:
    (space per card) - (width of card)
    = 2.75" - 1.38"
    = 1.37"
That seems like enough space for the fans to be able to efficiently run and cool the cards off.
Each graphics card is held by (at least) one screw on the top:
Using the math we just did, we will need to calculate the position of each of the mounting screws. Because not every card has two screws, only one screw is really needed. It is easier; therefore we will only be using one screw per graphics card for mounting.
The following formula can be used to determine the positions of the screws at any given card number (starting at 1, going to 6):
    t(n) = (space per card) * n - (arbitrary number)
    t(n) = 2.75n - 0.75
I chose the arbitrary number, 0.75, in order to get the best fit for the cards. Card #1 (the first card) and card #6 (the last card) should both be about equal distance from the side of the crate, so the arbitrary number helps keep them about equally as far. The number comes from the width of each card, 1.38 inches, divided by 2. I rounded the result, 0.69, to 0.75 just for convenience.
Anyway, here are the results. The number before the colon represents the card number, and the number after is the distance from one side of the metal bar:
    #1 : 2"
    #2 : 4.75"
    #3 : 7.5"
    #4 : 10.25"
    #5 : 13"
    #6 : 15.75"
For now, just mark each of those points on the bar with a line. We'll determine the exact position now.
This step will require you to have one of the dual slot GPUs handy. If you don't have one yet, you can either wait, or you can jump to the "I'm impatient" section.
I have one handy: You have one axis marked for the positions of the screws, but you're missing the other. This can be determined by taking your graphics card, lining the screw hole on the card up with each of the lines you drew in the previous step, and filling in the screw hole on the bar with a pencil.
I'm impatient: Wow, okay. This is kind of a hacky solution, but it's understandable if you are impatient. At each line that you drew, about 2/3 the way along the line from the "bend" in the L-shaped rod (the corner), draw a point so you know where to drill later.
Now, clamp the bar down on the length of the crate (make sure it's lined up), at the top. Also, make sure the markings you drew are on the top side.
Take a drill to it, and make a small hole an inch deep on each using a #35 drill bit.
Use a tap and die set for 6-32 screws in each of those holes. Now, you should be able to put in the graphics card screws.
Alright, we have basically everything done with this card. So now, from the side view of the crate, drill another two holes on either side of the bar and put a screw in each to make sure the bar will stay there. Remove the clamp.
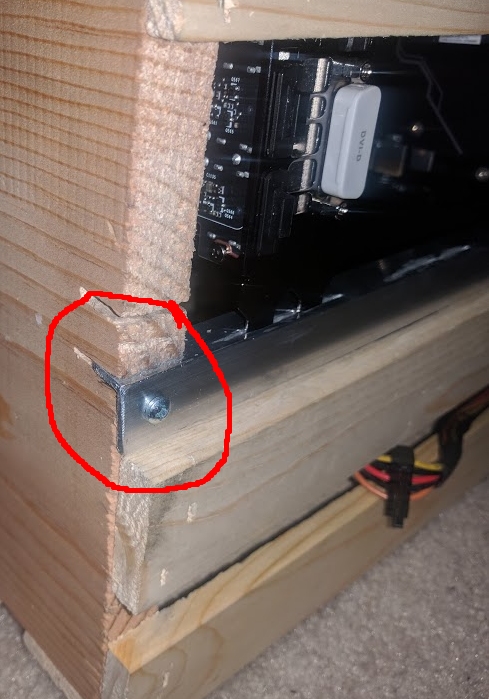
The next part is to work on the graphics card mounting "tab" (shown in the image below):
Because you have already completed and attached one half of the bar you sawed earlier to the crate, it's time to mess with the second half.
We need to make something for the mounting tab to sit in, so the weight of the graphics card isn't entirely on the one screw. Thus, it doesn't slide around as easily.
First, pull off the plank that is second to top on the crate on the side you are working on. Saw two horizontal slits in the wood about 4.5" down from the top on either side of box for the second half of the metal bar to fit into, like so:
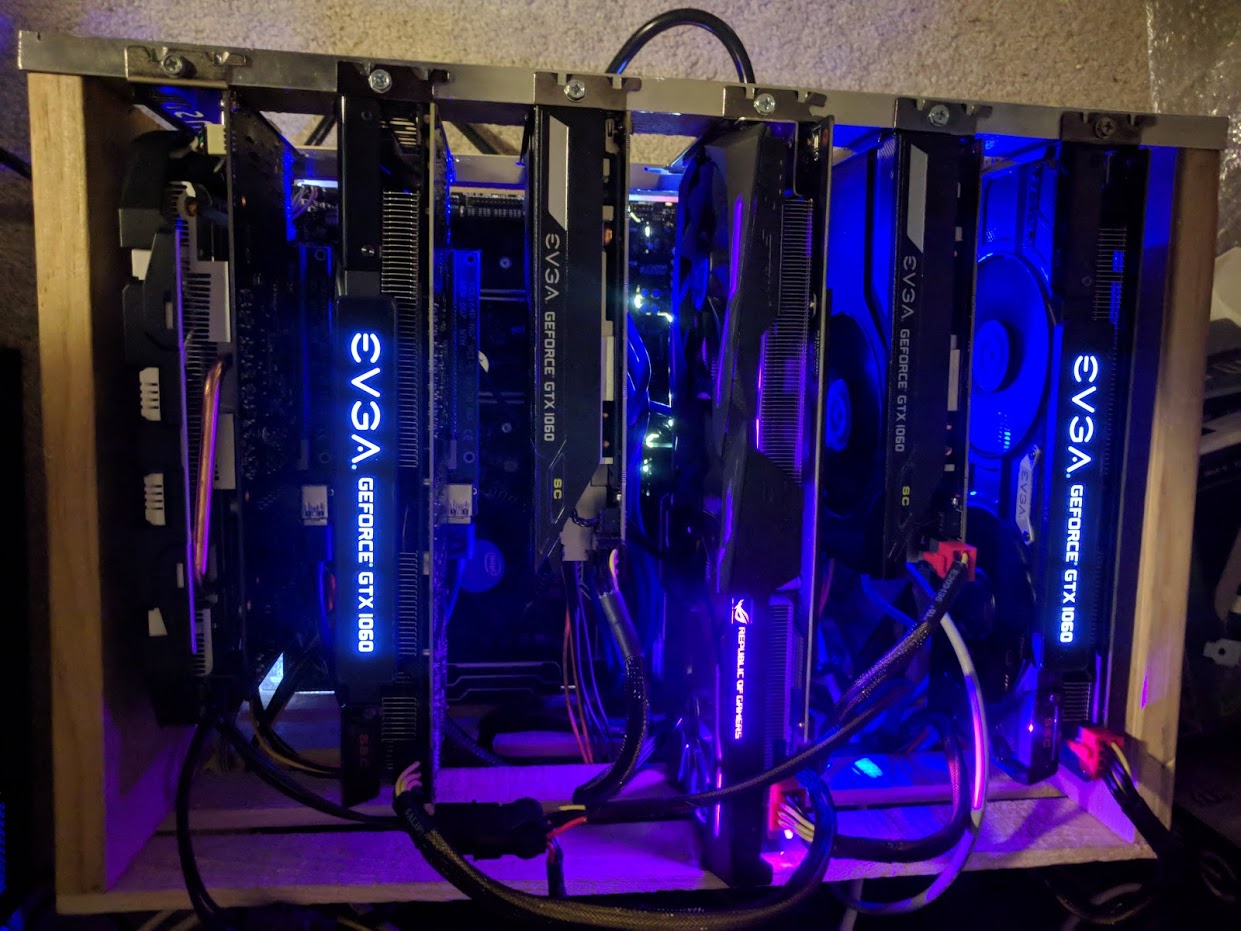
(ignore the fact that there are already graphics cards mounted in the case; I took this photo after building it)
I'd recommend also drilling a hole and putting a screw in on either side of this lower bar too, as seen in the above picture. It will help keep it in place, as there will be a force pushing against it from the graphics cards.
Now, you need to make slits in the lower metal bar for the GPU mounting tab to stay in. Use a dremel tool to cut a 2.75" long slit about 1/8 an inch from the outfacing edge of the metal bar, centered directly underneath each of the screw holes of the top bar (can be seen in both the above and below image).
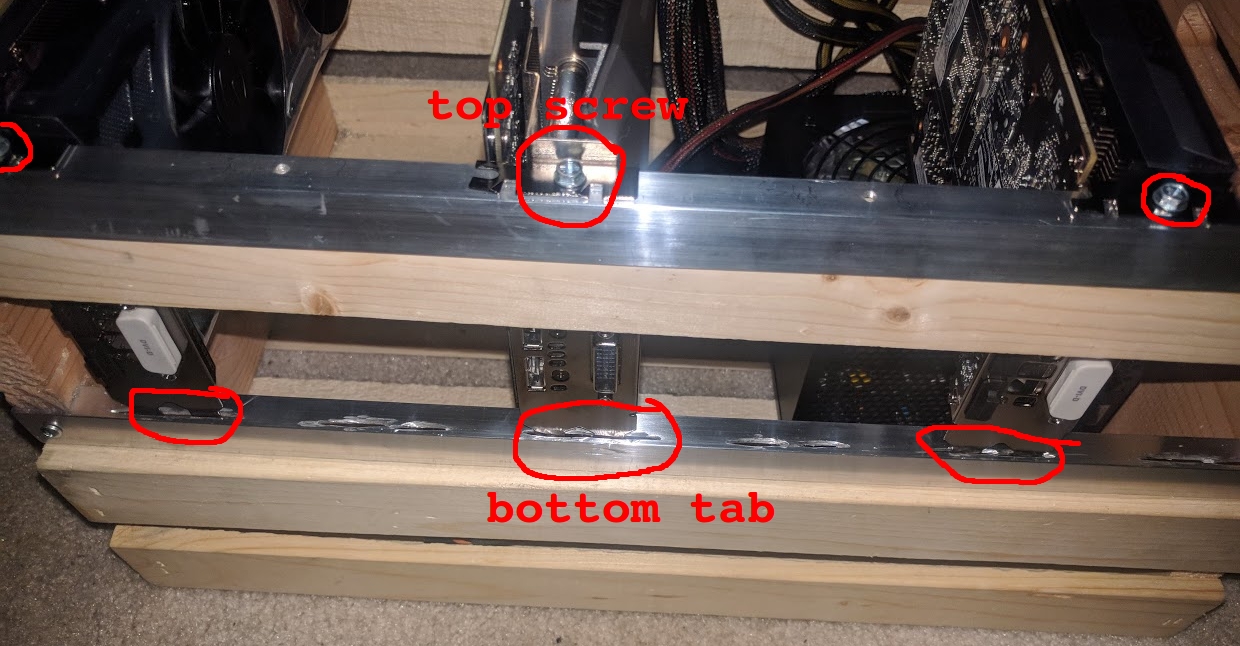
(again, don't mind the components that are already inside the case)
Be sure to try mounting one of your dual slot GPUs in each of these slots to confirm that everything fits and is the right size, etc. Modify whatever you need to make it work.
At this point, it is a good idea to break off all of the remaining wood planks on the side that the graphics cards are mounted to, except for the one that is holding the card, or the second one from the bottom, like so:
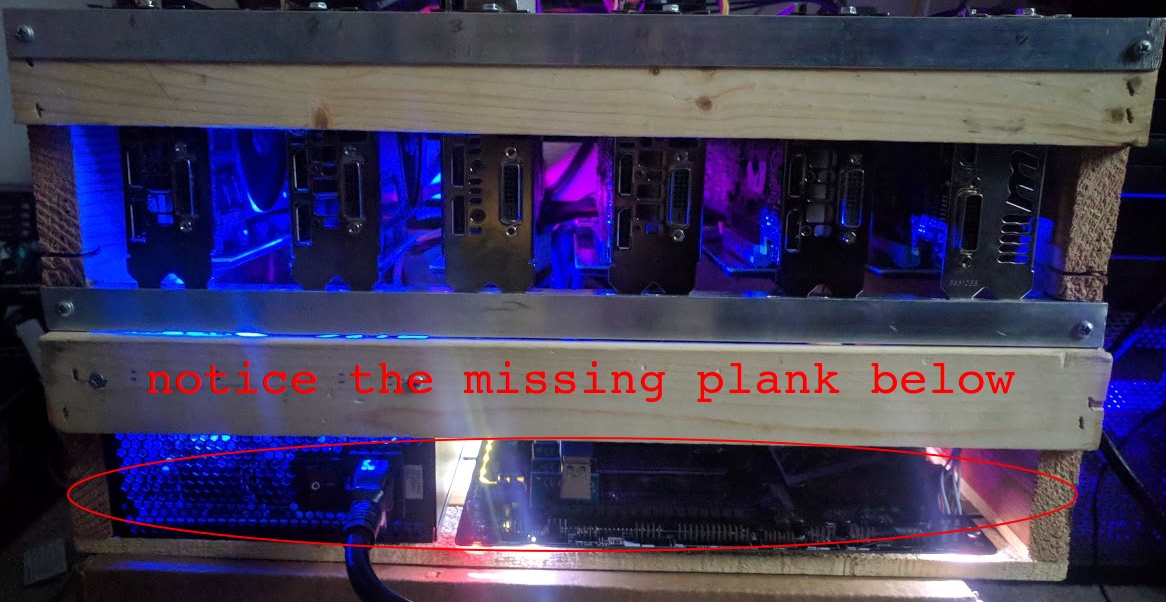
This step is required so that (as seen in the picture above) the power supply switch and cable has room to stick out. The plank that is second from the bottom should remain in place so that the power supply has something to mount to.
Speaking of which, we should drill the holes for the power supply to mount to. We'll only be able to use two of the screw holes on the power supply since the bottom plank was removed on this side.
I know this is quite hacky, but what I did to mark where the holes should be drilled is,
- Find screws that fit in the power supply, but are too long for it (1 inches long at least). The screws don't actually have to fit, they just have to be snug in the power supply's screw holes and point straight out.
- Put the screws in the power supply screw holes enough so they stay in place and point out.
- Push the power supply against the side of the case and forward to the plank so that the screw heads touch it.
- Take a pencil and outline around the screw heads as much as possible.
- Remove the power supply from the box and take the screws out of it.
Now, you should have two markings for holes to drill. Find a drill bit that's a bit larger than the #35, then drill a hole straight through the plank at each of the markings. The reason why you should get a drill bit that's larger than the screw is because I find that it's quite difficult to accurately predict where the screw holes need to be, and this gives you a little extra room for error.
Put the power supply back in place with the fan pointing up and the power switch and power cable input facing out, and get a screw that is long enough to go through the plank and into the power supply. Put a washer on the screw to make sure it still holds in place even though the screw head will be on wood, and the screw hole is larger than it should be. Screw it in.
The power supply is now in place, so now you have a reference for where you need to place the motherboard. The bottom of the image is the side where the graphics cards are mounted, and this image is looking from above down.
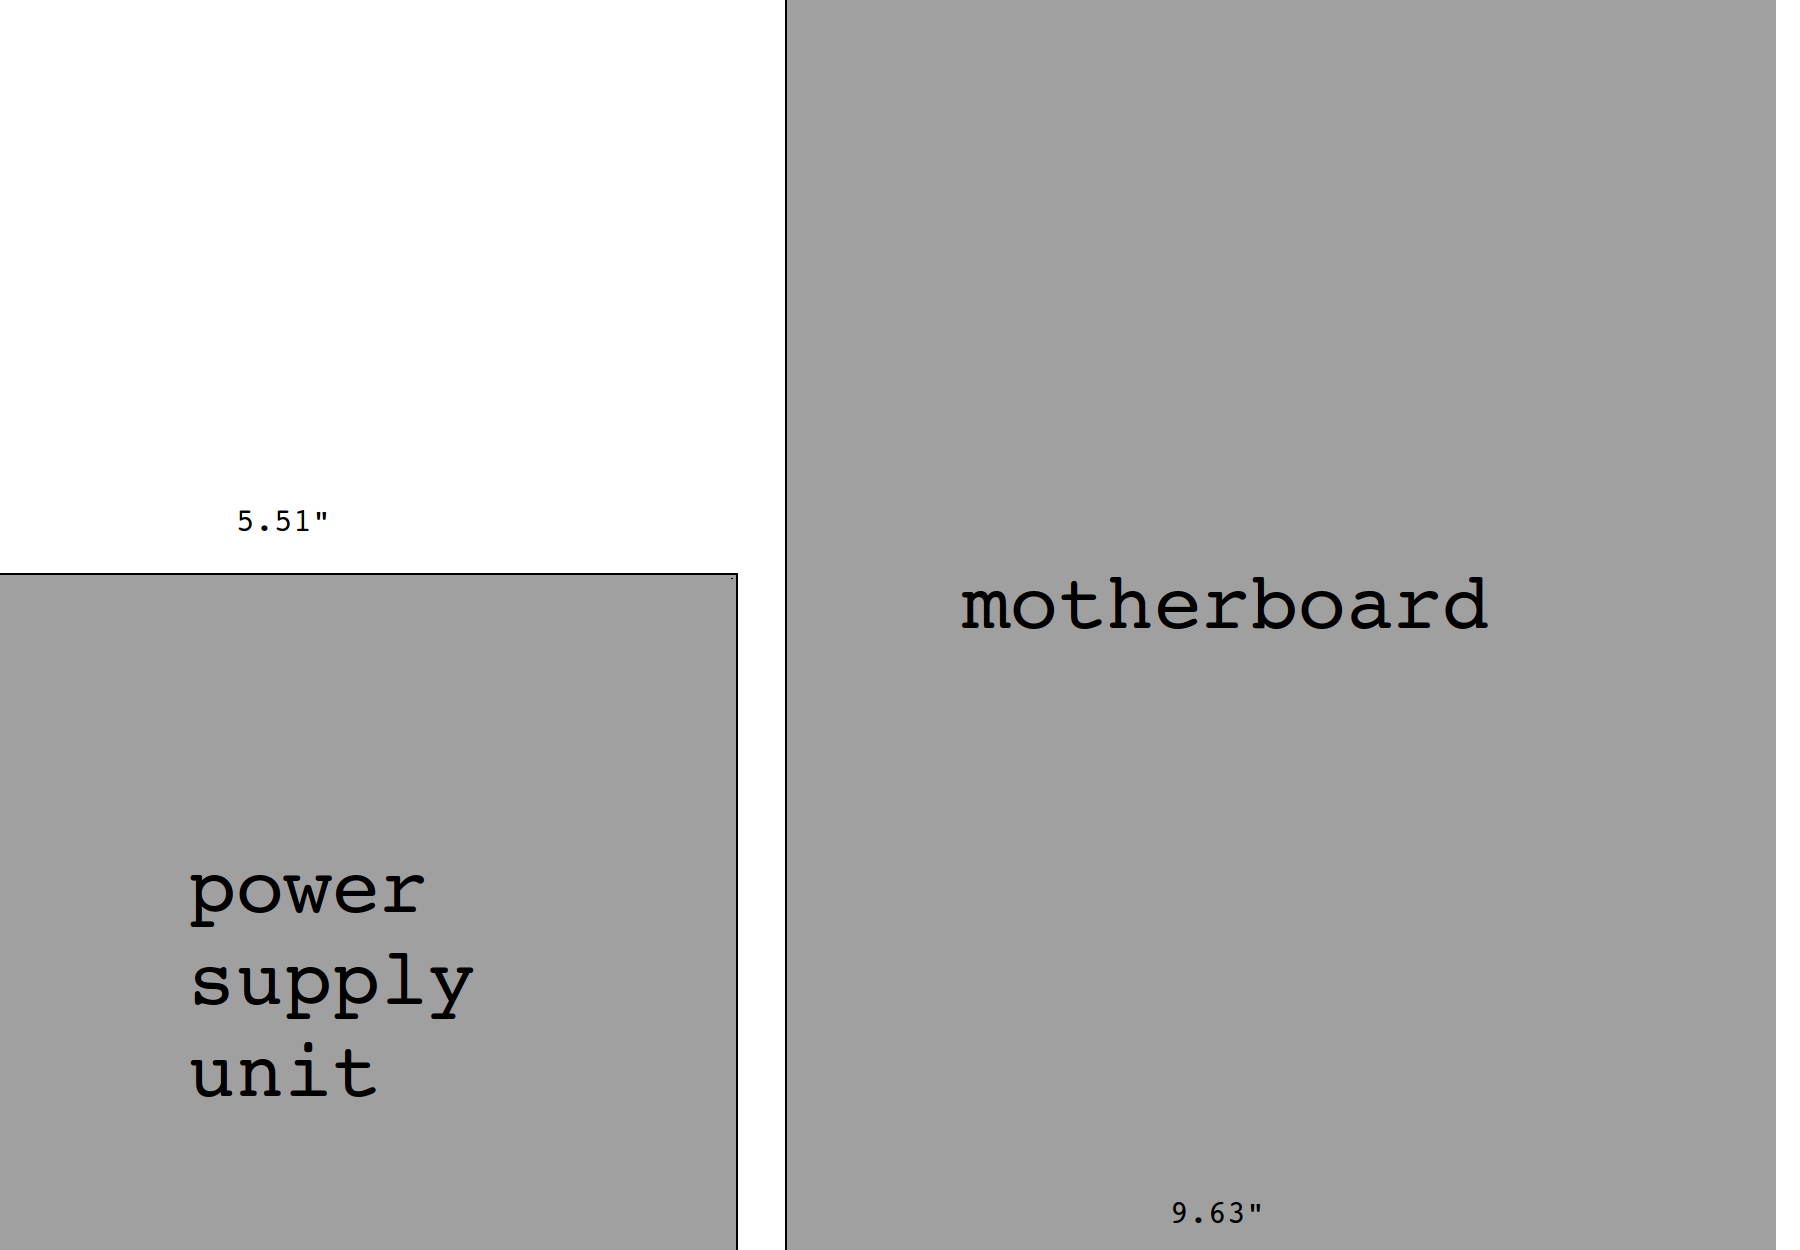
Time to find the motherboard holes to drill. Take your MSI Z270 SLI PLUS motherboard, and place it beside the power supply, so that it hits the plank on the opposite side from the graphics cards' mount. Don't worry that the motherboard is sticking out a little on the other side, it isn't a problem. Center the motherboard between the power supply unit and the wall.
Also, do not worry that the audio ports are blocked by the power supply. I hope you don't plan on using your mining rig to listen to music.
Take a sharp pencil and, while holding the motherboard firmly (but carefully) in place, mark each screw hole on the wood below the motherboard (just stick the pencil through each screw hole on the motherboard). Some of the holes won't have wood underneath it, but most will, and you can safely ignore the ones that don't.
Now, remove the motherboard, unscrew and remove the power supply unit, and get your drill ready with a drill bit that's slightly larger than a #35. Drill straight through the wood on the bottom at each point that you marked, so that there are holes for the motherboard mounting screws to go through.
If you want to make your own standoffs for the motherboard too (recommended), get a 1" diameter plastic tube (or something similar), and cut off sections that are about 1/2" tall. When you mount your motherboard, simply put these on top of the holes in the wood but beneath the motherboard, then set the motherboard on top carefully. When you put your screws through and tighten it, these plastic tube sections will hold the motherboard 1/2" off the wooden surface.
If you'd rather just buy standoffs, you can get them here and just use hot glue (easier) or screw them on (better).
When mounting, you'll need about 8 1" long 6-32 screws with 6-32 nuts. The nut will hold the screw in place from underneath, and the screw will go straight through the hole in the motherboard and the wood.
Congratulations, your case is completely built. Time to begin mounting your components in it.
Assembly
First, mount the power supply and the motherboard in. Get your CPU and put it in the CPU socket, and put the CPU cooling fan and heat sink on the CPU (it should already have thermal paste on it, if you got the one I recommended earlier). Take your RAM stick out and carefully place it in the motherboard. Use a SATA cable to plug your SSD into the motherboard. Now, use the power cables that came with the power supply to power the motherboard and the SSD.
If you need help with any of those steps above, either email me, or Google the step you're stuck on.
I recommend plugging in a USB hub. While it is not required, it is a good idea to have one set up; after you have 6 graphics cards put in, it's painfully difficult to squeeze your arm through the separation between the cards and plug a USB cable in, plus the power supply's cables are in the way.
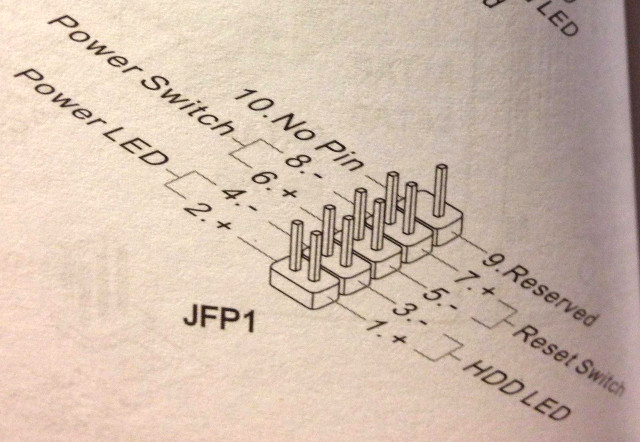
You probably want to be able to turn your rig on and off, right? If so, you should add in a power button and a reset button (might as well add in hard drive activity lights while you're at it).
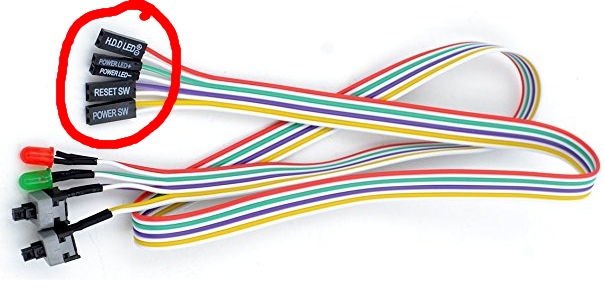
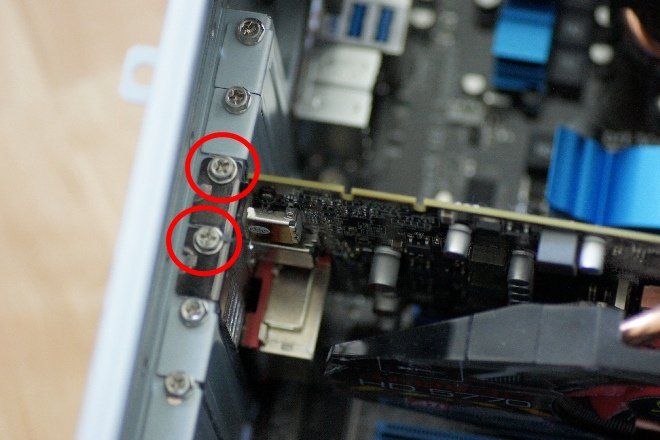
Simply take the input pins on the strip shown above and plug them in the slot labeled JFP1 in the order shown below.
At this point, your setup should look something like this:

Plug in a monitor, keyboard, and a mouse, and try booting the computer now, without any graphics cards. See if you can get into BIOS. If so, shutdown and move to the next step. If not, go back and do some troubleshooting. You're probably missing a step, or you got something wrong.
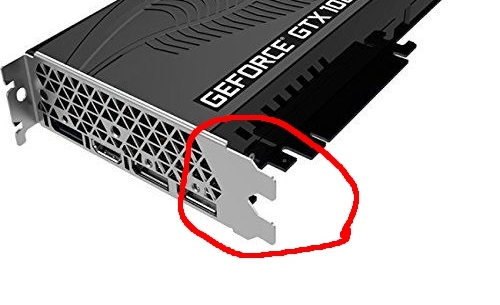
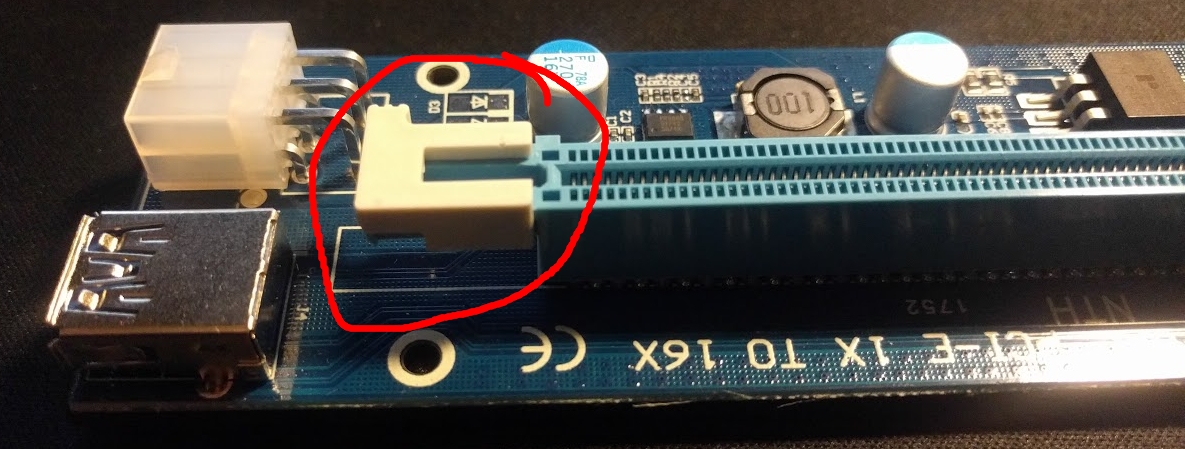
Alright. Time to set up the first graphics card. First, you'll need to get one of the riser card adapters out. Snap the board onto the bottom of the graphics card (it should fit right it, but make sure it's on tight). Lock the board into place using the tab circled in the below image:
This riser adapter card should have come with a 2x SATA power to 1x 6-pin power cable. Plug that into the slot on the riser card and into the SATA power connectors on the power supply.
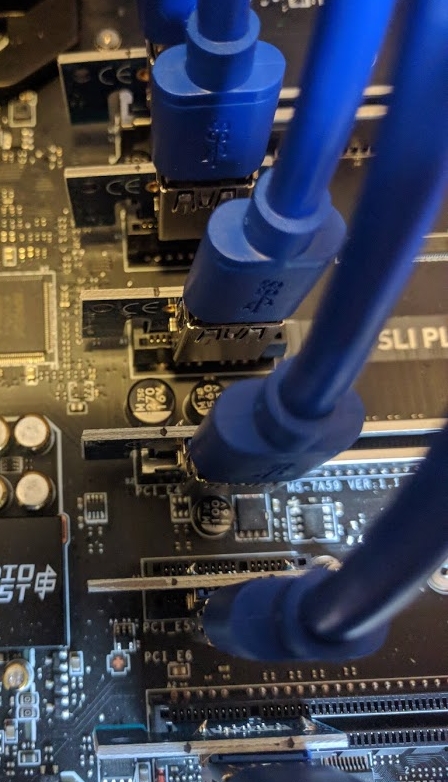
Now, plug the 1x PCI-e to USB adapter into the "first slot" (really, any available slot at this point will work). Connect the male-male USB connector from the adapter to the riser card, as seen in the image below:
Note: You don't need to worry about the fact that mine has six set in place.
Repeat these steps for each graphics card you put in.
To put in a card, first put the two "tabs" at the bottom of the graphics card into the slots, then screw it in at the top. You should start out by putting in only 4 graphics cards, and after you set up your mining environment, you can add the last two; there is some configuration you need to do before using any more than 4 cards.
At this point, you should have anywhere from 1-4 cards plugged in and mounted. Let's configure it so that you can use more than 4 now.
Plug the monitor's video cable (preferably DVI) into any graphics card. If you don't get any display when turning it on, try plugging it in to the motherboard instead. If it still doesn't work, try removing the graphics cards one by one until it does work. But hopefully you'll be lucky, and it will work first try.
I would recommend not adding in the last 2 cards (only have 4 or less) until you have installed the operating system and set the miner up; it tends to have more problems when there are more than 4 cards installed, and it is best to get everything set up before dealing with these problems.
Operation
To set this miner up, you will need to install Linux, join nanopool, download mining software, and run a few scripts.
Installing the Operating System
You'll need another computer (other than the mining one you built), and a USB drive or blank DVD handy (USB drive is better). Plug it in / put it in to your computer, and open an internet browser.
Find an ISO file for the OS file you want to use. In this tutorial, we will be using Linux Mint, as it is a simple, fast operating system, and is easy to begin with. You can download the latest version here.
I don't know what operating system you are currently using, but you will need to use an image writing software to write the ISO file to your media disk/drive. If you want full steps, Google search for "how to write an image file to [dvd/usb drive] on [operating system]".
Now that you have bootable media available, plug / put it in to the ports available on the mining rig's motherboard. You may have to use an external USB drive if you went with a DVD. Plug in a monitor to the first graphics card (GPU #1).
Power the mining rig on. If nothing appears on the screen, try powering it down, unplugging all of the graphics cards, and moving the video cable to the motherboard's one (or simply reducing the number of cards plugged in at once), then powering it on again.
Boot Linux Mint. You may have to change the boot order in BIOS to boot from the USB drive or open the boot menu (by pressing the DELETE key on MSI motherboards when booting) and select the USB drive, depending on the motherboard and the BIOS configuration.
Once Linux Mint is running, double click the disk icon on the desktop that says "Install Linux Mint".
Follow the install guide. If you can't figure out how to, there's a world of information at your fingertips. Feel free to Google and find a tutorial on installing Linux Mint. When setting your username, make it something basic like
miner, and also make your hostname be something basic likeminer. Remember or write down your password!When asked if you want to, I would recommend selecting the option to download third party drivers. Set the username and password to whatever you want. But, do not encrypt the drive, and be sure no password is required on login after boot. This is because, you may not have a monitor and a keyboard available when you press the button to power on the miner, and you want it to be able to log in automatically. If you have a monitor and a keyboard ready at all times, these options don't matter.
Once you have unplugged your USB and booted Linux successfully, congratulations. You are ready for the next step.
Setting Up the Mining Software
I have written a script to automatically set everything up for you. If you would prefer to do everything by hand, it's much more difficult, but it can be done. If you're sure you want to, I'd check out the script to see what needs to be done.
Make sure you only have 4 or less graphics cards in when you do this step.
Press Ctrl+Alt+T once logged in to open Terminal.
Make sure the rig is connected to the internet, via Ethernet (preferred) or WiFi. Execute the following script, and respond when asked for input:
cd ~ && curl https://arinerron.com/blogres/1_setup.sh > setup.sh && bash setup.sh
- Write down the IP address that it outputs on paper when it's finished with the script. Reboot the computer by running the command:
sudo shutdown -r 0
Visit the mining control panel hosted by the rig by going to http://192.168.xxx.xxx/ from another device connected to the same network (replace xxx.xxx with whatever the last two octets of the IP address are; you wrote it down earlier).
Make sure the hashrates look right (basically, make sure they aren't 0 MH/s, so you know it's running). Sometimes it takes time for the rig to get started, so give it a minute if they are at 0 MH/s.
You're ready.
Well, it's pretty much set up. If you have problems with drivers, try opening the Driver Manager application and choose NVIDIA's proprietary drivers.
Configuring BIOS
Again, confirm that you still only have 4 cards or less in when you configure BIOS. These instructions will be specifically for the MSI Z270 SLI PLUS motherboard.
Shut the computer down. If it doesn't want to turn off when you press the power button, just hold it (I've done it hundreds of times, and though it's not necessarily good for the OS, Linux has always been able to recover. It is not dangerous to the hardware).
Turn the rig on. Press the DELETE key until it opens BIOS. You may have to do this multiple times until it opens BIOS, if you're not fast enough. When BIOS opens up, you should be greeted by something that looks like this:
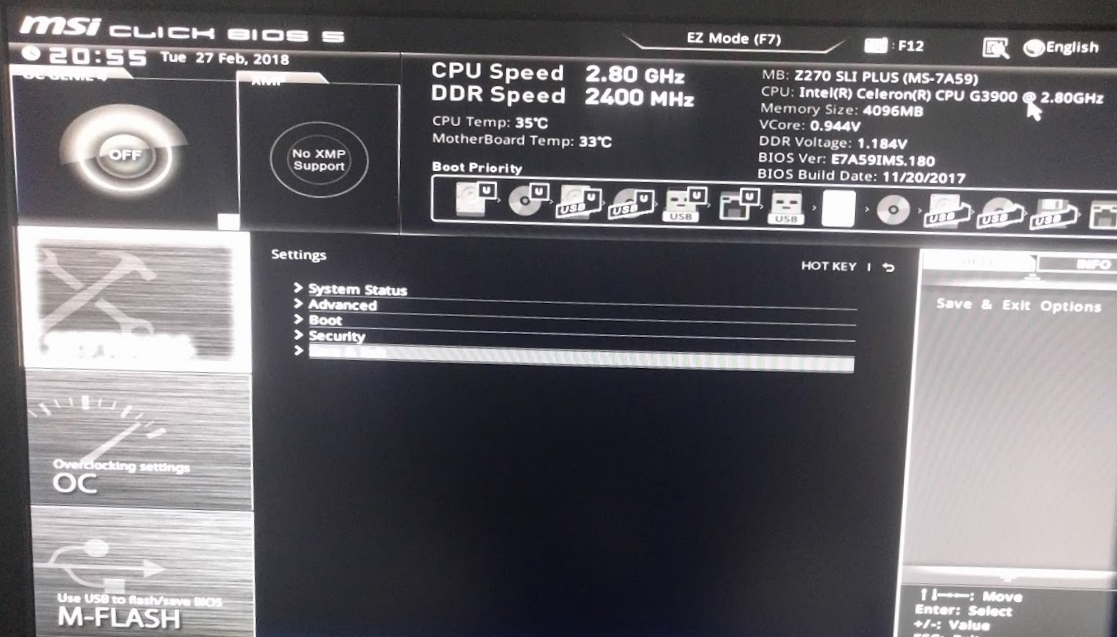
Press F7 to switch from EZ Mode to Advanced Mode.
Use the arrow keys on your keyboard to select Advanced option.
Go into the Power Management Setup menu and change Restore after AC Power Loss to
Power On.Go back into the Advanced menu then to Integrated Graphics Configuration. Then change Initiate Graphics Adapter to
PEG.

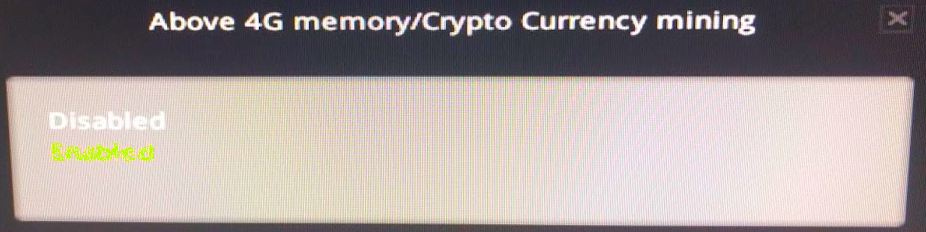
Now go to Advanced\PCI Subsystem Settings and change both PEG0 - Max Link Speed and PEG1 - Max Link Speed to
Gen1, and change PCI Latency Timer to96.Finally, change Above 4G memory/Crypto Currency mining to
Enabled. Note: Once you do this, when you power your rig on, if you plug in a monitor, you will NOT be able to see anything. However, assuming you wrote down the IP address earlier, you will have access to your rig still over SSH! If you ever need to use the GUI, simply power off and on your rig, then press DELETE key until it opens up BIOS, then disable this setting.
- Exit out of the Advanced menu, then in Save & Exit choose Save Changes and Reboot (a confirmation dialog will appear. Just choose
Okay).

- Unplug your monitor-- it won't work anymore now that you have Above 4G memory/Crypto Currency mining enabled. You can SSH your rig still when it is powered on, though.
Overclocking
First, I want to note that overclocking can be dangerous to your hardware, and caution should be taken when overclocking your rig. I am not responsible for whatever damage overclocking may cause. Only proceed with these steps if you understand the risks.
Now that that is out of the way-- Overclocking can actually improve your rig's hashrate a decent amount. The below table represents the stock hashrate (Stock MH/s) and the overclocked hashrate (OC MH/s) that I was able to acheive for each card:
| Name | Stock MH/s | OC MH/s |
|---|---|---|
| MSI GTX 1060 | 15.650 | 17.600 |
| EVGA GTX 1060 SC | 19.730 | 21.700 |
| EVGA GTX 1060 SSC | 19.745 | 21.750 |
| ASUS STRIX GTX 1060 | 20.250 | 22.300 |
Stock MH/s is the stock hashrate, and OC MH/s is the hashrate when the cards are overclocked.
So, you can overclock any 1060 and you will get able 2 MH/s more while it is still stable. But how much does that really make extra, and is it worth the extra electricity?
After doing some testing, I noticed a +2 watt and a +2 MH/s change when overclocking each card. Where I live, at $0.098 / KWh, that is $1.72 in electricity per year but $45.01 extra mined per card per year (at current price). Worth it? Definitely.
Also, I was quite surprised when found out from testing that there was virtually no temperature difference between the overclocked cards and the cards that weren't.
I used the same configuration for all of the graphics cards:
Graphics Clock Offset: +125 MHz
Memory Transfer Offset: +700 MHz
Note: If you try these settings and the overclock is not stable for some reason, reduce the clock offset by 25 MHz and the memory transfer offset by 200 MHz, and you should have no problem.
Edit: I found an even better configuration that's much faster (but slightly less stable, unfortunately):
Graphics Clock Offset: -150 MHz
Memory Transfer Offset: +1050 MHz
Okay. Now how do you actually overclock the cards?
On Windows, there's a nice program called MSI Afterburner which makes it really easy to overclock your cards. On Linux, however, it is not as simple. The "automatic setup" script I provided earlier created a watchdog script that makes it much easier to overclock your cards.
Remove any monitor you may have connected, make sure all of the graphics cards you want to overclock are in, boot up the rig, then SSH into your mining rig by running ssh yourusername@ipaddress (replacing yourusername with your username, and ipaddress with, well, your rig's IP address).
You will need to have a lightdm server running on :0 at all times. Start one by running sudo service lightdm start.
Now, in your home folder (~), you will find a file named overclock. Edit that file with vim or nano. You'll see several lines that look like this:
sudo DISPLAY=:0 XAUTHORITY=/var/run/lightdm/root/:0 nvidia-settings -a '[gpu:GPUID]/GPUGraphicsClockOffset[3]=CLOCKOFFSET' -a '[gpu:GPUID]/GPUMemoryTransferRateOffset[3]=MEMOFFSET' | grep "assigned value"
In the above line you replace the following values to configure it:
GPUID- The graphics card ID, from 0 to 5 (for a total of 6 cards).CLOCKOFFSET- The offset of the clock (duh). The lower, the higher you can setMEMOFFSET. But if it's too low, it will crash.MEMOFFSET- The memory transfer rate offset. The higher theMEMOFFSET, the higher the hashrate. And of course, this can't be too high either or it crashes.
Once you finish doing that, you can put your changes into effect by running ./overclock. If the rig's hashrate drops all of the sudden, fluctuates violently, or the fans go blaring, then something is wrong, and you most likely need to undo your changes then reboot to fix it.
Conclusion
Well, that was a fun (and expensive) project. It's been running for about 3 months since I've published this post, and I haven't had any major problems. Ocasionally, I'll need to reboot it or something, but mostly, it runs on its own and manages itself (it automatically restarts itself when it crashes, etc).
It was nice during the winter, because I didn't have to keep the air heater running; the mining rig was practically a furnace, and I actually had to open the window to keep it cool inside my room. During the summer it'll probably be a little more miserable, but deal with it when it comes time. /shrug
This rig can actually work very well for other cryptocurrencies that are mined primarily using graphics cards, such as Zcash, Monero, and Electroneum. I'll be experimenting with those soon and might add in an update in this post with my progress.
If you ever need to remotely manage it, you can always use SSH to connect and run commands remotely. And worst case scenario, if it doesn't shutdown when instructed to do so, you can just hold the power button and it will shutdown whether it likes to or not.
Also, if you ever have any problems, feel free to contact me. I've had a lot of time to find problems with this rig and learn how it works, and I would love to help you.
Thanks a lot for reading this, I hope this helped you. :)